John McGee, Virginia Tech

Note: several YouTube videos are also available to learn how to use DNRGPS
Overview
DNR Garmin was developed as an easy-to-use “point and click” software application that allows you to manage, manipulate, and save data from a Garmin GPS receiver for use in GIS programs such as ArcMap, MapWindow and AccuGlobe. DNR Garmin is shareware created and maintained by staff at the Minnesota Department of Natural Resources. DNRGarmin works with ArcGIS 9.x, and was developed primarily to support Garmin GPS receivers. DNRGarmin received a major update revision, and has since been renamed DNRGPS. DNRGPS is compatible with ArcGIS 10.x, Google Earth, Most Garmin GPS’s, and is not only just compatible with Garmin GPS receivers, but other NMEA output GPS receivers as well. While DNRGarmin and DNRGPS are very similar, this article will focus on DNRGPS.
While there are a number of things that DNRGPS software can do, some of the functions most applicable to Extension agents include the following:
- Educators can use this software package to transfer GPS/GNSS data (hereafter referred to as GPS) between a Garmin GPS receiver and a PC.
- DNRGPS can save GPS data as projected (or unprojected) shapefiles for use in ArcMap, as graphics, as a database files, or as text files for use in other programs.
- The program allows for initial projection of GPS data (e.g., waypoints, routes) to many different map datums (e.g., Lat/Long, UTM/UPS, country grids).
- Information can be filtered in various ways and waypoints sorted according to specified criteria. Route and track statistics are available and can be transferred into other programs for analysis (e.g. spreadsheet programs).
DNRGPS unfortunately does not have any self-contained mapping functionality that allows you to view your data before you save it to your computer. This guide is written using the Garmin GPS60 GPS receiver. All other GPS receivers will follow the same protocols. A more indepth user guide has been provided by the Virginia Geospatial Extension Program and is available from here: http://gep.frec.vt.edu/pdfFiles/DNR_GPS_manual.pdf
Before Using DNRGPS
The instructions in this handbook assume the following:
- You have already installed DNRGPS software on your computer. DNRGPScan be downloaded for free from the Internet.
- You have already collected GPS data (e.g., waypoints, routes, tracks) and have stored the GPS data on your GPS receiver.
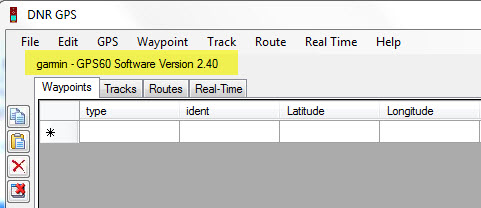
Starting DNR Garmin Software
Start DNRGPS by selecting it from the program list on your computer, or (depending on how you have installed the software) clicking on the DNRGPS icon (it looks like a small calculator) on your desktop.
Connecting Your GPS
- Connect your GPS receiver to the computer using the data cable provided with your GPS receiver. Make sure that your GPS receiver is turned on.
- DNRGPS is configured to work with most recreational grade GPS receivers, and is defaulted on first use to search for a USB connection to your GPS unit. If you GPS receiver is connected with a USB cable, DNR Garmin will connect automatically with your unit.
- If a serial port connection is being used, DNRGPS will prompt you to retry to find a USB connection. Cancel this prompt. If this is the case, go to <GPS>, then <Set Port>, and select the port being using, most likely Port 1. DNRGPS will automatically connect to your unit.
Once connected, the status bar on the top of DNRGPS window will tell you that your device is connected.
DNRGPS will also list the projection information that your data will be projected into once downloaded. Step 4 tells you how to change this projection to one of your choice.
Your GPS should now be properly communicating with your PC through the DNRGPS Software.
Setting up the Datum
- Now that your GPS unit is connected, you can set up the datum/projection that you would like your data projected to when it is uploaded to DNRGPS. To do this, go to <File> , then <Set Projection>. This brings you to the Garmin Properties dialog box (This can also be accessed by going through <Waypoint>, <Track> or <Route> and the “Properties” option, then the “Projection” tab.).

- The Properties dialog box will appear with several tabs. Select the “Projection” tab. Here you are allowed to choose from a wide range of datum/projections< from the pull-down menu under “Datums/Projections,” that your GPS data will be projected to once downloaded to DNRGPS. Once a projection is selected, click “OK.”

Downloading Waypoints
You Are Now Ready to Download and Save Your GPS Data
Unfortunately, DNRGPS does not allow you to download more than one type of data at the same time. You must download and save waypoints, trackpoints, and routes individually. However, the same method is used. Depending on which type of data you have, you go to the corresponding menu (<Waypoint>, <Track>, or <Route>)and then <Download>. DNRGPS will automatically download the selected type of data and will display the data as shown below.

Review of terms:
- Waypoints: These are “virtual points” or marks that you have saved in individually. Waypoints can be assigned customized names (the GPS receiver assigns them numerical names [001, 002] by default).
- Tracks: Tracks are a previous path of travel. Basically, you turn on your GPS receiver and it will start to “map your movements.” Trackpoints are individual points that are used to create a track (if you connect these points, with a line, you would have a track).
- Routes: A route is a “path to a destination with intermediate stops along the way.” The “stops” along the way are defined by waypoints.
One feature of DNRGPS allows you to choose what fields that you want your data table to have once it has been saved. To do this, access DNRGPS’s Property dialog box through any of the methods mentioned in Step 4. Go to the tab that is related to the type of data you are working with (e.g., tracks). Under the “Properties”option (i.e. “Waypoint Properties” is your list of fields associated with your data. You can uncheck/check the combination of fields that you want, or just choose to leave all fields checked. The checked fields will be the fields in your attribute table and database once you have saved the data.
Choosing Fields

Note: Some fields, such as x and y coordinate fields are required by DNRGPS and cannot be unchecked. You will be prompted with a message telling you if it is required, though.
Saving Your Data to a PC
You can save the data that you have collected on your GPS receiver directly to a “GIS readable” file (e.g., shapefile) or in an array of other formats.
- Make sure the file that you want to save (e.g., waypoints, tracks) is “visible.
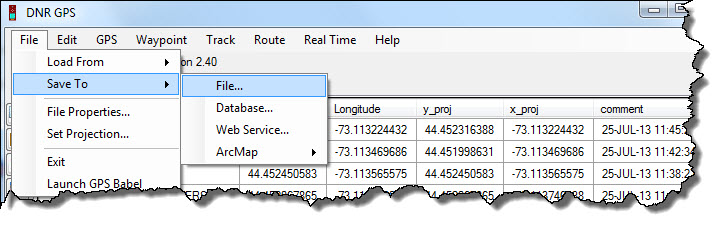
- Under the <File> menu, select <Save To>, and <File>.
- To save in a GIS compatible format:
- Enter a <Filename>.
- Under the <Save As Type>, option, choose either:
- ArcView Shapefile (Projected)- this option saves data directly to a GIS-compatable shapefile according to the user-defined projection
- ArcView Shapefile (Unprojected)- this option saves data directly to a GIS-compatible shapefile as well, but according to the unprojected coordinates directly from the GPS unit.
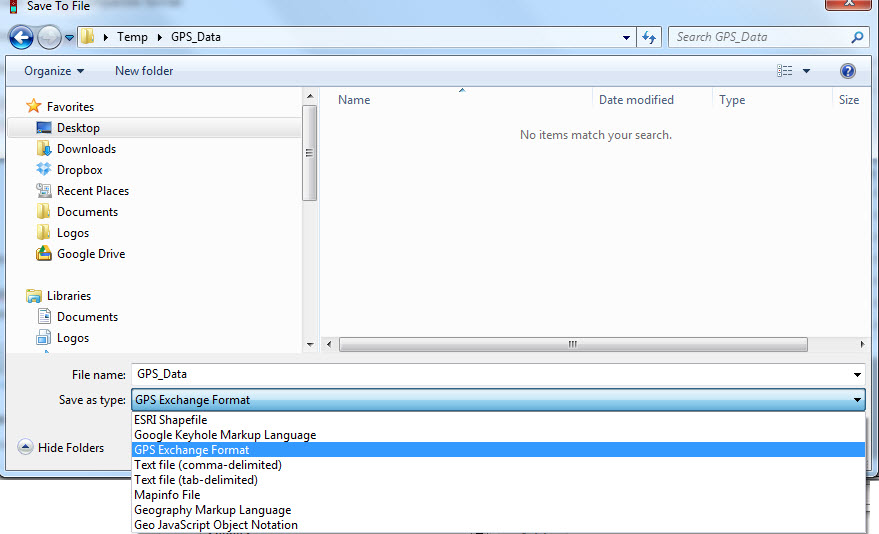
Presto! You have created a GIS-compatible file from your GPS data.
Your waypoints and tracks can also be saved as a GoogleEarth KML file, a GPX file (which is a standard file format that allows the sharing of GPS data between an array of GPS receivers), and an array of other formats (text, etc.).